
Businesses may want to have customer data in QuickBooks for many reasons. However, recording customer data in QuickBooks can sometimes be time-consuming and, if done manually, bears a risk of errors and inconsistencies that may later negatively affect the management of transactions and corrupt accounting reports.
The customer data synchronization feature in Synder facilitates customer record keeping in Quickbooks, enabling you to bring accurate and up-to-date customer details from multiple sales channels into Quickbooks.
Here’s how it works and helps.
Why do you need to have customer data in QuickBooks?
Having customer data in accounting may not be necessary for every business. However, if the character of your business requires invoicing your customers regularly, tracking sales by customers, understanding how much this or that customer owes you, or having billable expenses (and thus, the need to track them by customer), you might want to have customer details recorded in QuickBooks. It makes customer tracking and invoicing way more accurate, convenient, and faster (which is no less important).
How to record customer data in QuickBooks?
QuickBooks allows you to both create customer detailed profiles within the system and import customer data from external sources. Let’s take a look at how you can do it using both options.
Add new customers in QuickBooks manually
If your business deals with a relatively small number of customers, like up to ten, this option will help you create highly detailed customer profiles and later on, manage and update them, track your transactions and revenue by customers in QuickBooks, and more. The workflow is simple.
To add the first customer in QuickBooks, you need to go to your Dashboard:
- Choose the Sales section and click on Customers;
- In the upper-right corner, click Add customer manually;
- Enter your customer’s details in the pop-up window that appears;
- Click Save.
To add more customers to your customer list:
- Get back to Customers;
- Click New customer in the upper-right corner;
- Fill in the customer’s details;
- Click Save.
That’s it. Now you can find and add your customers in QuickBooks.
Import customers to QuickBooks from spreadsheets
However, if you have more customers than ten or, let’s say, twenty, adding them manually might take too much time, and sooner or later, you might make a mistake, such as misspelling a name, for instance. A better option would be to import your customers from an Excel spreadsheet or a CSV file (especially if you already have this file at your hand). Basically, most of the sales platforms and payment processing systems allow for downloading your customer data as an Excel/CSV file, so it shouldn’t be a problem to have this data prepared for import.
To import your customer list to QuickBooks, go to the Dashboard:
- Select the Customers section;
- In the dropdown next to New customer, pick up Import customers;
- Click on the Browse button;
- Go through the upload steps, then click Next;
- Map the fields in your file to match those in QuickBooks, then click Next;
- Select the customers you want to import and click Import.
Record customers to QuickBooks automatically
Both options described above can work for you. However, automated customer data import can be a faster and more accurate way, as it eliminates manual entry and removes intermediaries in the form of uploading and then downloading Excel/CSV files. QuickBooks allows for direct integration with several e-commerce and payment platforms, as well as third-party import solutions.
As everything else, this has its pros and cons. We’ve already outlined the biggest pros. As for the cons, having different solutions for data import may require you to maintain multiple subscriptions. Due to this fact, there can be duplicate data coming from different sources, which can result in creating more than one profile for the same customer, and customer data can be fetched in different formats, etc.
How to synchronize customer data to QuickBooks using Synder
No matter how many customers you have and how many platforms you use, Synder will help you bring them to your QuickBooks automatically with only a little effort during the initial setup. Then you won’t have to get back to it – the software will keep doing it automatically according to the settings. (cool, right?).
The biggest pro of using Synder is that it allows you to connect multiple payment and e-commerce platforms to your accounting, and all the data is recorded in the same format. Moreover, it’ll be protected from duplicating, as Synder detects duplicate records and doesn’t let them in, keeping your books clean.
How does it work?
Customer data synchronization is enabled by default in the standard settings. It means that Synder will fetch customer details with every transaction from every sales channel you connect, and record them in QuickBooks. There are two basic scenarios.
- If a customer already exists in QuickBooks, Synder will recognize it and apply a transaction, as it occurs, to this customer.
- If a customer doesn’t exist, Synder will automatically create a new customer in QuickBooks, using customer details it fetches from a payment processor or an e-commerce platform.
How to enable/disable customer data synchronization in Synder
As mentioned above, the feature is enabled by default during the initial setup. However, you can change your settings later. To do so, log-in to Synder, and go to the Dashboard:
1. Choose your Organization (if needed) and click Settings in the general menu on your left;
2. In the Integrations section, select the platform you want to change your settings for;
3. Click Configure;

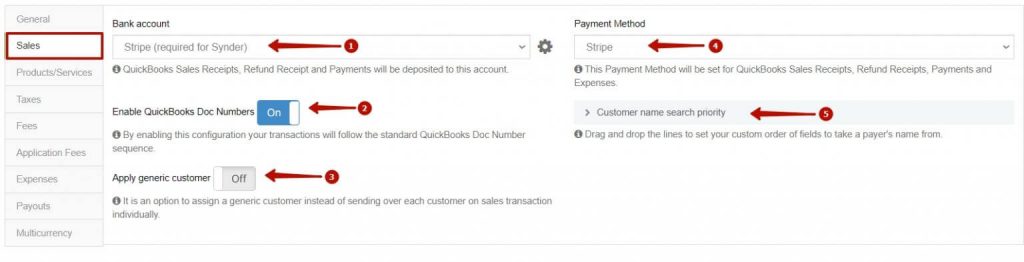
4. Under the Default tab, pick the Sales setting;
There, you’ll find a number of settings you might want to change, such as your bank account, enabling QuickBooks doc numbers, and more.
5. Turn the Apply generic customer OFF to make Synder synchronize customer data to QuickBooks (it’s number 3 on the picture below);
6. Or turn it ON if you don’t need customer details in QuickBooks. This way, Synder will create generic customers for your transactions (they’ll be reflected as Stripe customer, or Shopify customer, with no additional details).
That’s it, you’re done!
For more information about various Synder products and features, and how they can help you manage your business, feel free to try a free trial or book a live demo with our magical Customer Success team.